The value of a number
- Like
- Digg
- Del
- Tumblr
- VKontakte
- Buffer
- Love This
- Odnoklassniki
- Meneame
- Blogger
- Amazon
- Yahoo Mail
- Gmail
- AOL
- Newsvine
- HackerNews
- Evernote
- MySpace
- Mail.ru
- Viadeo
- Line
- Comments
- Yummly
- SMS
- Viber
- Telegram
- Subscribe
- Skype
- Facebook Messenger
- Kakao
- LiveJournal
- Yammer
- Edgar
- Fintel
- Mix
- Instapaper
- Copy Link
Posted: 12 December 2009 | Richard Dempster, Director, Product and Technological Development, AIB International | No comments yet
Often, we get in the habit of accepting numbers from computerised displays without regard to accuracy or precision, and when we do evaluate a number, we often look at how precise it is. We forget that we can be very precisely wrong. We don’t really pay close attention to numbers from our bank’s ATM, a gas pump or a near infrared instrument unless we think they are substantially wrong. We certainly pay closer attention to our bank account but tend to accept numbers from other devices that may have greater monetary importance and higher error rates. In this article, I will give a brief overview of the main sources of error specifically associated with near infrared (NIR) instruments and what effect these errors have on the number displayed. The overall goal is to interpret the numbers correctly. In this article, I use NIR as a general term to include both reflective and transmission instruments.
Often, we get in the habit of accepting numbers from computerised displays without regard to accuracy or precision, and when we do evaluate a number, we often look at how precise it is. We forget that we can be very precisely wrong. We don't really pay close attention to numbers from our bank's ATM, a gas pump or a near infrared instrument unless we think they are substantially wrong. We certainly pay closer attention to our bank account but tend to accept numbers from other devices that may have greater monetary importance and higher error rates. In this article, I will give a brief overview of the main sources of error specifically associated with near infrared (NIR) instruments and what effect these errors have on the number displayed. The overall goal is to interpret the numbers correctly. In this article, I use NIR as a general term to include both reflective and transmission instruments.
Often, we get in the habit of accepting numbers from computerised displays without regard to accuracy or precision, and when we do evaluate a number, we often look at how precise it is. We forget that we can be very precisely wrong. We don’t really pay close attention to numbers from our bank’s ATM, a gas pump or a near infrared instrument unless we think they are substantially wrong. We certainly pay closer attention to our bank account but tend to accept numbers from other devices that may have greater monetary importance and higher error rates. In this article, I will give a brief overview of the main sources of error specifically associated with near infrared (NIR) instruments and what effect these errors have on the number displayed. The overall goal is to interpret the numbers correctly. In this article, I use NIR as a general term to include both reflective and transmission instruments.
NIR instruments typically have three main sources of error: instrument error, reference error and the math that ties those two together – the regression model (calibration). All of these errors enter into the resulting number displayed. Most users will fault the instrument for an errant number, but today’s NIR instruments probably provide the least amount of error to the number.
One main source of NIR error is in the laboratory values. These values are used to create a regression model (calibration). Most laboratories return the average value of the sample, actually analysing several sub-samples of the product. You rarely see the standard deviation of those sub-samples, nor do you see how many sub-samples were used to calculate the average. I have the fortune to be director of our laboratory and generate the calibrations that I research; therefore, I have the ability to keep close track of the laboratory error rate. I require a minimum of three sub-samples for all samples destined for specialised calibrations. I monitor the within standard deviation of these sub-samples closely and re-examine any outliers that may occur. In addition, I run true replicates without the knowledge of the laboratory personnel.
To digress a bit, laboratory error is the difference between the values you get from the laboratory to the actual values. When discussing the actual value, we’re looking at accuracy and this is a very elusive value. Usually, we use probability to determine the most likely value but this is a subject for another article. What we’re really looking for is the difference between the actual value and what the laboratory reported. The best method to determine this error is to subscribe to a check sample service where the same (as close as possible) product is sent to various laboratories in hopes that the mean of the laboratories is close to the actual value.
You can keep track of laboratory errors in three ways. First, monitor check samples every few months as most check sample services only send one per month. Send in true replicates to detect between sample variations, occasionally send replicates that are days apart to test for day to day variability or to see if climatic changes influence the results, but care of the sample is a must as biological material change with time. These are always sent in blind, the code only known to you. Finally, if possible, monitor within variation using the individual sub-sample results that make up the average. A few years back, we installed a database that requires all the sub-sample results to be entered. This made keeping track of the within variation quite easy, especially since I developed a simple program to automatically compute the standard deviation and CV, and emails the report directly to me.
Jumping ahead to the NIR instrumental errors; depending on what is being analysed, there may be more sources of error than in the laboratory but much lesser value and weight. Instrument noise, usually generated by heat, can vary based upon the location of the instrument. There is not much you can do with this error other than understand it. Noting that it may affect the fringes of the sensor more due to the lower detection sensitivity in the extreme ranges, thereby lowering the signal to noise ratio. If it’s too great, increasing the number of scans per sample may help, though it may be better to move the NIR instrument to a controlled environment. When developing calibrations, try not to include the ends of the spectra due to detector response. You can save a lot of calibration time if you can find the response curve of the detector you’re working with. Usually a response curve of a standard reference material will give adequate information for determining spectral regions to exclude in a calibration due to noise or sensor sensitivity. One error that should be examined prior to purchasing a new instrument is repeatability without replacement. That is, can you get the same number by just re-scanning the sample without moving it? If the standard deviation is too large for your application, look for another instrument. The acceptable standard deviation is usually determined by the desired precision of the product to be predicted. The problem could be in the regression model, so I only compare raw spectra from these scans. Drift is an error that I’m starting to see more of. As the electronic components age, their performance drifts away from the original specification. Today, I find a lot of older instruments still being used without testing of the prediction error rate. The number came from the instrument so it must be right!
Errors that are also associated with instruments but are not instrumental errors include the following: particle size, packing pressure, temperature (especially in liquids), and others based on the type and style of NIR instrument. These are described as presentation errors and are independent of the NIR instrument but can be specific to the instrument due to the manner in which a sample must be presented. Even though you have a standard operating procedure, just changing who prepares and scans the sample can make a difference. The point is; we tend to become relaxed when we’re doing the same procedure every day. We also tend to have the newer personnel do the routine ‘simple’ duties, and then wonder why we get inconsistent results. Either we’re back on track or we need further training, but we must monitor the results in order to make the correct decision.
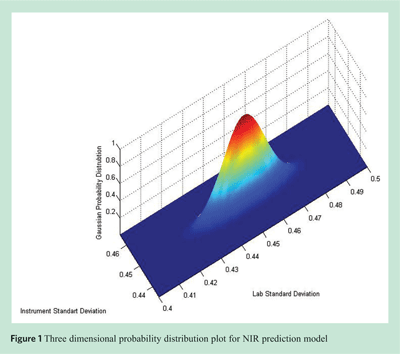
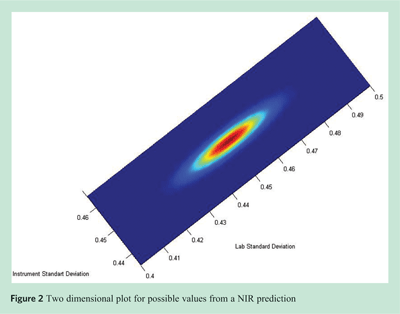
Including all the errors associated with the laboratory procedure and the errors associated with the instrument, you can construct a probability density plot that will allow you to visually see the possible numbers you can get from any one sample. Figure 1 is a three dimensional plot that illustrates the combined effect of laboratory variation and instrument variations. In this illustration, the numbers used are just examples but are close to variations I have seen. Figure 2 is the same plot, just rotated to give a perspective of the different width of the two error variations. When a value is given from a NIR scan, it can come from any part of the area that is not solid blue. We assume the true value is in the centre, and we hope that our value is in the centre, too. In all probability, the number’s location is some distance from the centre and the true value is not the centre either. All samples I work with come from a normal distribution population, therefore these plots are valid for my samples. In cases where the distribution may be exponential, binary or some other distribution that may occur in the chemical industry or other industries, the plots should be constructed using the appropriate distribution formula. Of course, the regression model comes into play here as well, but that generally effects the position of the probability distribution in the x, y plane and not the laboratory or NIR instrumental standard deviation.


Finally, we come to the regression model that ties the reference laboratory values and the instrument spectra together to yield the number you hope is correct. The goal is to find the perfect relationship between the NIR spectrum and laboratory reference values. In reality, we’re trying to find a reasonable relationship given the instrument error space and the laboratory error space. This is an area where there is still a lot of discussion, research and development. There are many regression models available and many choices for pre-treatment of the spectra and laboratory values. A good calibration requires the following: skill, the proper tools, knowledge of the population space, knowledge of the spectral space, knowledge of chemistry (specifically food chemistry in my case), patience and time. It should be clear that development of calibrations is expensive and there are no short cuts. Selection of the incorrect regression model will obviously yield incorrect results regardless of how good the laboratory data or the instrument is.
Obtaining good laboratory reference values can cost tens of thousands of dollars. This may be the main reason for not maintaining calibrations. There are some methods to reduce the cost of the reference samples. If you fully characterise the population under study, one may be able to select a unique sample set that fully encompasses the variation expressed by the population. In certain populations, obtaining this set may be impossible as occurrences of samples in the tails of a normal population may not happen in a timely manner. If one fails to account for the variation or range of the population, then large errors can occur due directly to the limits of the calibration. Using a calibration outside of its range accounts for the biggest source of error, especially in the food industry. We see so many samples within the first standard deviation that we just accept the one that is outside the third standard deviation range. A calibration should never be used outside of the sampling range.
Another source of error is certain outliers. I have found a number of samples that are predicted wrong and after having them reanalysed and rescanned, they still fall outside the known prediction error rate but are perfectly good samples. Researching outliers is a growing trend and recently there have been some suggestions that the linear calibrations may be inadequate for our biological world. The difficulties of moving to a cubic, quadratic, or polynomial calibration is great and the closest we have today to a non-linear calibration is neural network calibrations, but these require vary large sample sets for training purposes and can be costly.
One must mention sampling procedures any time you are obtaining small quantities from a large population. Often only a few grams of product are used to characterise metric tons of product. Even though the results from an NIR scan are within acceptable limits, an incorrect sample will incorrectly describe the product. One must know the variation of the population in order to properly sample it. In addition, when sampling for calibration development without knowing the full range of the population, you may unknowingly increase the error rate of the two ends for the regression model. You may not have the proper number of samples required to fully express the regression model. This is not necessarily an error of the regression model but an error in the procedure to obtain a model. I recently had to redo a calibration because of lower bake absorption values I received from a new wheat crop year. In many cases, it may take many years to know or see the full range of possible values. Many users of NIR cannot adapt quickly to changes in the population, and many of today’s calibrations are based off of too few of samples, especially when dealing with year-to-year variability and major long-term weather cycles.
In summary, there are many books and web pages available to help reduce the various errors discussed. Dealing with noise alone may require a college course in noise theory. Therefore, in most cases, you may be limited as to the control you have over these errors, but realising how the value you received was obtained is the first step to getting closer to that elusive true number. I may have painted a very poor picture of NIR, but as I visit various companies that use NIR, I find that there are far too many instruments that have not been tested or properly maintained since the day they were purchased. In reality, an NIR instrument that is well maintained, frequently tested, and ran by a well trained staff provides a rapid and very economical tool to obtain valuable data.


